Monthly Archives: February 2020

The “Joys” of Photographing Watercolors

IMG_8518

Eddie's Wreaker

Eddie Johnson Wreaker and Cat

I’ve  been at this photographing my art for online and making prints thing for a lot of years. Never have I enjoyed it, and never has it been easy. It is a comprise at best. Even here I did’t get it exactly how I wanted it.

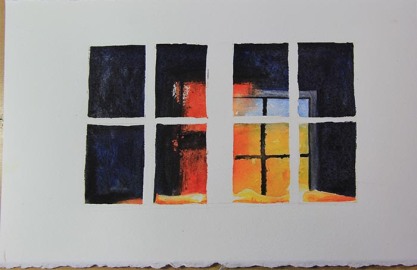
So what is my method? In answer, I don’t have one, but several, depending on what works and if the sun is out. Back in the days of film, things were even that much more difficult what all with light temperatures and the like. But I will have to say, film had one advantage I’ve yet to see with digital: it did a better job by far with the red/orange end of the scale and also with the blue/turquoise shift.

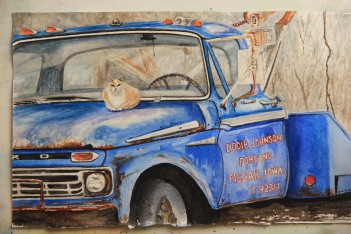
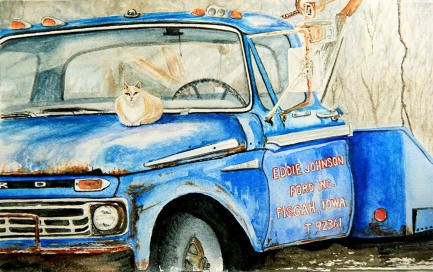
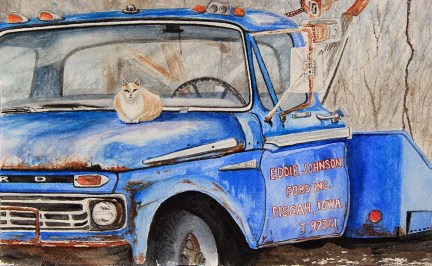
In this example, I used a combination of cobalt blue and manganese (turquoise) blue watercolor on the truck. The photographs I took tended to shift the blues to a violet cast. That was perfect for the background; the first photo’s background is more true to the painting. But the subject was way off. So I imported the photo into Photoshop and bumped up the contrast to match the painting. Next, I used the color correction tool and added more yellow and cyan to get the truck to look more turquoise. This brightened it up and fixed the truck, but I lost detail in the background. If I were going to make prints of this painting or use the photo to enter it in a show, I would not be satisfied with the results above. What could I do to make it better?

Originally, I took the photo outside in the shade. This was like putting a grey film over the painting and then photographing it. I’ve had fair luck taking photos on cloudy days, but the shade is just not good. Photoshop can correct a lot, but it can’t work miracles.  I’d like to note here, when taking the photos outside or otherwise, I usually lay them flat on the ground rather than propped up. It has to do with the shadows caused by the grain of the paper. If the paper is flat on the ground, it eliminates those shadows.

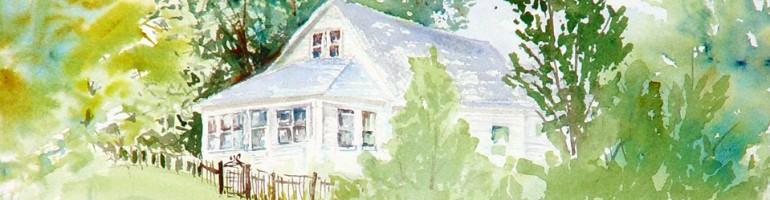
The last photo was taken in the sun on a sunny day. It gave me better results overall. I usually try to wait until I have natural sun to take most of my photos. I still had some Photoshop adjustments to make, but the photo was better to start with so that helps.

I have tried lights, but never with any better results than natural sunlight. Besides, they take up space and are awkward to set up and take down. I just didn’t care for them. Traditionally, I’ve always used my Canon SLR camera with a telephoto lens to correct for keystoning. Keystoning is the distortion caused by wide angle lenses and will make your painting look like a trapezoid rather than a rectangle.  When photographing, I try to visually line up at least one edge as straight as I can in the view finder. If I’m off, this can be corrected in Photoshop, by turning the photo by degrees or cropping.

Lately, I have also had really good luck with the camera in my I-phone 7. It tends to make the painting a little more contrasty. This can be helpful sometimes and shows me where I might want to add more contrast in the painting in reality. The thing that the phone camera excels at is being able to take photos in just about any light and having them automatically temperature corrected. I still import them into Photoshop to fine tune, or even use the camera’s editing tools. One thing the phone camera has a hard time with is the soft delicate washes I use so often. In this case (with the truck) I had terrible results with my phone camera, so I did use the Canon SLR.


Leave a comment

Filed under watercolor art

Goats with Heads Like Bicycle Seats

Goats

These are my neighbors goats. I don’t know much about goats, but I thought this was such a great pose. I didn’t even notice the fourth goat in the barn until I was studying my reference photo, taken some years back, and saw him peaking out. I don’t paint animals very often, so I set myself a challenge with the goats. My daughter asked about the short ears so I looked it up and apparently these are Lamancha goats. All I know is that when I was drawing them, I thought it was remarkable how their heads reminded me of bicycle seats.

It was a pretty straightforward transparent watercolor, the white is the white of the paper. The hardest part was getting the proportions right in the drawing. After that, it turned out to be a fun painting and I might have to try animal paintings a little more often.


Leave a comment

Filed under watercolor art

Missouri River Valley

Field of Curly Dock

Yay, a painting without masking fluid! While it has its uses, I would rather just paint than go through all the rigmarole of using masking. This is a typical Missouri River Valley scene: cornfield in the distance, farmsteads and Loess Hills in the background.

I pass this few acres of CRP ground on my way to town every day. I love how it changes from year to year. Sometimes it is curly dock, like above and sometimes it is sunflowers.  I don’t always use all the colors on my palette, so this painting afforded me the opportunity to play with some Indian Red and Venetian Red to capture the velvety texture and color of the curly dock. Both of these reds are semi-opaque and sedimentary, so their use is limited, but proved perfect for this job. Most of the time I like to stay with the clear, transparent colors. The difficulty here was moving between the red and the green without mixing them too much because, as they are complimentary colors, it would turn to mud.

When I finished this painting, I still wasn’t quite satisfied. I couldn’t figure out what it needed until I studied it for awhile. The answer came to me in the form of cropping. I put a mat on it and cut off a good deal of the foreground, which was green, and it instantly improved the painting without adding another brushstroke; even the proportions are better.


Leave a comment

Filed under watercolor art

A Lesson in Masking a Watercolor

Window Sunrise

The finished piece above is a morning sunrise as seen through the windows of our old city hall building across the street from me. I loved the reflections and geometric shapes. I knew it would be a challenge to paint the reflections, so I started with them first. In order to paint freely across all the windowpanes leaving the white of the paper, masking was in order.

Window masking

As I planned my approach, I knew that using tape would produce a straight, clean line and best protects the paper. If using masking fluid, sometimes it doesn’t cover and you will discover unwelcome surprises of dark paint where you do not want it. When criss-crossing tape, there is a danger of paint bleeding where the tape meets in the corners as well. Because the windows are old and they have glazing compound along the edges, I didn’t want exactly straight lines, so I first applied the tape, then laid a thin line of masking fluid along the edges. This served two purposes, to give it an uneven edge and to prevent paint from bleeding under the tape.


Window mask removed

I then painted the inside of the windows, having fun with the reflections and dark background. When the painting was completely dry, I carefully removed the tape and masking. When possible, I try to pull the masking off rather than rubbing it with a rubber cement pick up because as you paint, some color will stick to the masking fluid. If you rub it, the rubber cement pick up will sometimes smear the color onto the white paper.

At this point, I redrew the lines with a triangle and T-Square. Pencil lines are usually lifted along with the masking. Then I covered all of the white area with a light wash of blue with just a pinch of rose. Even though the building is white, it is in the shade so I toned down the pure white. It is good to note here that once pencil lines are painted over, it is pretty much impossible to erase them. After that it was just a matter of filling in the lines and shadows to complete the piece. Even though I use a straightedge to draw the lines, I freehand paint everything. It isn’t an architectural rendering; it’s a painting, so I like the hand-painted look.


Leave a comment

Filed under watercolor art, watercolor painting tutorials

Visioneering

I don’t usually show the reference photo, but in this case it has everything to do with my goals for this painting. The reference photo is poor to say the least. The owl has little detail beyond a silhouette, but I did think it had potential. Usually, I paint faithfully from the photo and I wanted to break out of that straight jacket. I wanted to make up a scene and see if I could “visioneer” it.

There is a faint halo of light behind the owl in the photo, so I thought it would be cool to go with that and make it into the moon, with a starry background. I also thickened up the tree to feel as if it were more of a solid support for the raptor. The first step was masking the owl, tree, and stars with liquid frisket. I used a toothbrush to flick the masking fluid onto the background and a paintbrush to apply the mask to the owl and trees. When working with masking fluid it is important to let it dry naturally, not with a hairdryer to speed up the process. The hairdryer can bond the mask to the paper making it impossible to remove.

Next, after the masking fluid was completely dry, I had fun painting the background loosely with blues and blacks. I painted this in a completely transparent watercolor technique, that is, with no white paint. The white you see is the white of the bare paper.

When this step was completely bone dry, I removed all the masking fluid and painted the trees leaving a white rim to give the illusion of being back lit by the moon. Since I darkened the background so much, I had to do something to make the trees stand out so the white rimming was the perfect answer.

The last step was painting the main subject, the Great Horned Owl. This was the fun part. In photography or in real life, the owl would go all dark against the moon, but painters enjoy that thing called artist license. So while I used the photo as a reference for the basic pose, I had to look at many other photos of GH Owls to get the amount of detail I painted here.  I think it makes a rather striking little painting.


1 Comment

Filed under watercolor painting tutorials

Corn Crib

Caged Corn

This sort of watercolor painting is one of my favorite kinds of challenges. It requires a good reference photo, a tight drawing, and planning. Because there is no painting over, only painting around in transparent watercolor, it takes quite a bit of working back and forth. I had to decide in which order to paint various parts, how and when to tape and mask, and where to use shadows for depth.

Sometimes no matter how accurate I believe the drawing and how good the idea, once the painting is finished it falls flat. This one came together so well it practically painted itself. I wish they all went that way.


Leave a comment

Filed under watercolor painting tutorials